/*
RC PulseIn Serial Read out
By: Nick Poole
SparkFun Electronics
Date: 5
License: CC-BY SA 3.0 - Creative commons share-alike 3.0
use this code however you'd like, just keep this license and
attribute. Let me know if you make hugely, awesome, great changes.
*/
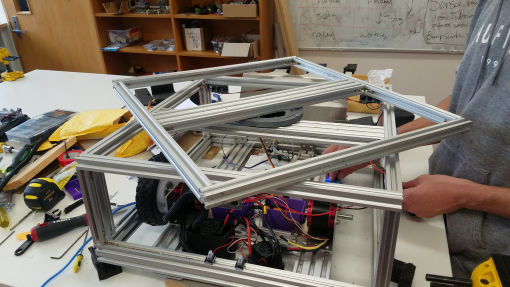
// Code base for FarmBot mark 2.
// Contributor's:
// - Anthony Lock
// - Damian Pang
// - James Woods
// Initial Idea:
// Goal is to have the Farmbot drive around from using the RC control, then to flick a leaver on the
// control (top left leaver - channel 5 on remote), then the robot will go into autonomous mode where
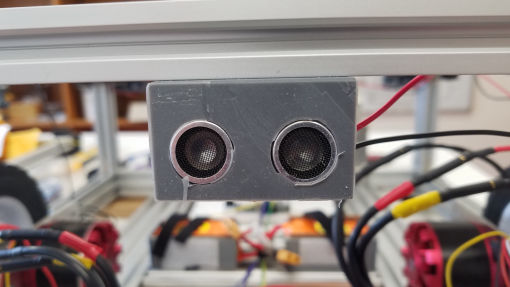
// it will scan the room by sweeping its turret left and right, then find a heat source by using the
// IR sensor on top in combination with a distance sensor, then lock target and try to eliminate. There
// are distance sensors around the perimeter of the robot so that when in Auto mode it should be
// coded to not crash into anything.
// Weapon for turret
// - Make your own :) (Gun??, fire??, Paint??, BIG chopper??)
// Important info about code:
// - Upon investigation when trying to pass the receiver information through the
// teensy arduino, then output to the ESC, the value is not being read properly.
// A potential fix for this is to use the servo libary within arduino to be able
// to output the correct signals.
// - All the methods for intended functionality are setup and ready for code to be implemented.
//
//
int trigPin = 9; //
int trigPin2 = 10;
int trigPin3 = 11; //
int echoPin = 7; //
int echoPin2 = 6; //
int echoPin3 = 5;
int ch1; // Right stick Forward Backwards
int ch2; // Right stick Left Right
int ch3; // Left stick Forward Backwards
int ch4; // Left stick Left and Right
int ch5; // Far left switch
int ch6; // Far right switch
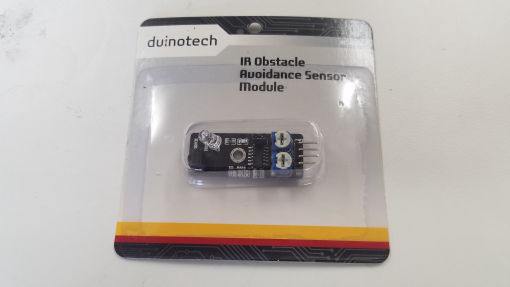
int IRSensor = 14; // connect ir sensor to arduino pin 2
int IRRead;
String ch5String;
String ch6String;
int led;
int leftMotor;
int rightMotor;
long distance, duration;
int echoTime; //variable to store the time it takes for a ping to bounce off an object
int calcualtedDistance;
int leftMotorOut = A8; //Left motor output value pin
int rightMotorOut = A9; //right motor value output pin
int leftMotorValue;
int rightMotorValue;
int distanceSensor1;
int distanceSensor2;
int distanceSensor3;
int duration1;
int duration2;
int duration3;
//Setup pins
void setup() {
pinMode(A1, INPUT); // Set our input pins as such
pinMode(A2, INPUT);
pinMode(A3, INPUT);
pinMode(A4, INPUT);
pinMode(A5, INPUT);
pinMode(A6, INPUT);
pinMode(A0, OUTPUT);
pinMode(leftMotorOut, OUTPUT); //Motor left and right output pins
pinMode(rightMotorOut, OUTPUT);
//Distance Sensors
pinMode(trigPin, OUTPUT);
pinMode(echoPin, INPUT);
pinMode(trigPin2, OUTPUT);
pinMode(echoPin2, INPUT);
pinMode(trigPin3, OUTPUT);
pinMode(echoPin3, INPUT);
pinMode (IRSensor, INPUT); // sensor pin INPUT
// pinMode('leftMotorPin', OUTPUT); //Analog out pin for the motor control
// pinMode('rightMotorPin', OUTPUT); //Analog out pin for the motor control
Serial.begin(9600);
}
//Baasic input control's getting data from the main channels of the
//joysticks and switches and converting them to a usable integer for functionality.
void loop() {
// getDistance();
ch1 = pulseIn(A1, HIGH); // Read the pulse width of
ch2 = pulseIn(A2, HIGH); // each channel
ch3 = pulseIn(A3, HIGH);
ch4 = pulseIn(A4, HIGH);
ch5 = pulseIn(A5, HIGH);
ch6 = pulseIn(A6, HIGH);
if(ch5 < 1005){//Channel 5 on off switch conversion Switch used for switching between AI mode and manual control
ch5String = "OFF";
manualControl(); //Use the manual control method
Serial.println("Assuming manual control");
}
else{
ch5String = "ON";
AI(); // Call the AI method
Serial.println("Assuming Artificial control");
}
if(ch6 < 1001){//Channel 6 on off switch conversion
ch6String = "OFF";
}
else{
ch6String = "ON";
}
//test();
//manualControl();
printing();
}
//Simple logs to console window of the input from controller
void printing() {
Serial.print("Channel 1:"); // Print the value of
Serial.println(ch1); // each channel
Serial.print("Channel 2:");
Serial.println(ch2);
Serial.print("Channel 3:");
Serial.println(ch3);
Serial.print("Channel 4:");
Serial.println(ch4);
Serial.print("Channel 5 Left switch:");
Serial.println(ch5String);
Serial.print("Channel 6 Right switch:");
Serial.println(ch6String);
Serial.print("Left Motor Out");
Serial.println(leftMotorValue);
Serial.print("Right Motor Out");
Serial.println(rightMotorValue);
}
//Function for moving the robot around via the controller
void manualControl() {
//This code may be unnecessary with the new esc's that the big robot is using for power.
// ch1 = (ch1 /100) - 14; //Rounding the channel input to a -5 - 5 scale for easy of use
// ch2 = (ch2 /100) - 14; //Joystick control reading
// ch3 = (ch3 /100) - 14;
// ch4 = (ch4 /100) - 14;
// Serial.print("Channel 4:");
// Serial.println(ch4);
//Forward / Backwards movement.
//Set the motors to be equal power in forwards or reverse.
if (ch4 < 1450){ //Turn left
leftMotorValue = ch3 - 2000; //Inside wheel powered by amount of throtle given, allows for tighter or slacker turning.
rightMotorValue = ch4; //Power outside wheel the amount you wish to turn.
analogWrite(leftMotorOut, leftMotorValue);
analogWrite(rightMotorOut, rightMotorValue);
Serial.println("Turning left");
delay(10);
}
else if(ch4 > 1550){ //Turn Right
leftMotorValue = ch4; //Power the outside wheel the amount you wish to turn.
rightMotorValue = ch3 - 2000; //Inside whjeel powered by amount of throtle given, allows for tights or slacker turning.
analogWrite(leftMotorOut, leftMotorValue);
analogWrite(rightMotorOut, rightMotorValue);
Serial.println("Turing Right");
delay(10);
}
else {
leftMotorValue = ch3;
rightMotorValue = ch3;
analogWrite(leftMotorOut, leftMotorValue);
analogWrite(rightMotorOut, rightMotorValue);
Serial.println("Moving forwards");
delay(10);
}
//servoMovment()
}
//method for basic testing of controls via remote input
void test(){
// if (ch3 > 5){
// analogWrite(A6, 255);
// analogWrite(A7, 255);
// }
// else {
// analogWrite(A6, 155);
// analogWrite(A7, 150);
// }
}
//Method for AI.
void AI(){
//have sensor input make thing do thing, and if thing happens do other thing whilst killing other thing.
//Automomasly
// getDistance();
// readSensor();
}
//void control() {
// if switch = ON manualControl = true
// if switch = OFF AI = true
// }
void getDistance(){
//variable to store the distance calculated from the echo time
//Get info from sensor 2.
// digitalWrite(trigPin, LOW);
// digitalWrite(trigPin, HIGH);
// digitalWrite(trigPin, LOW);
// duration1 = pulseIn(echoPin, HIGH);
// distanceSensor1 = (duration1/2) / 29.1;
// Serial.println(distanceSensor1);
//
// digitalWrite(trigPin2, LOW);
// digitalWrite(trigPin2, HIGH);
// digitalWrite(trigPin2, LOW);
// duration2 = pulseIn(echoPin2, HIGH);
// distanceSensor2 = (duration2/2) / 29.1;
// Serial.println(distanceSensor2);
//
// digitalWrite(trigPin3, LOW);
// digitalWrite(trigPin3, HIGH);
// digitalWrite(trigPin3, LOW);
// duration3 = pulseIn(echoPin3, HIGH);
// distanceSensor3 = (duration3/2) / 29.1;
// Serial.println( distanceSensor3);
}
//Method used for the servo's to move into position.
void servoMovment() {
//get servo position, '0' for the servo will be in the middle of the servos stroke.
//They way it will work is that when the sensors detect a foreign object, the top turret
//will lock onto the target, It will know its locked on when the sensor that has found it
//stays consistently at the same point, then the motors will turn the base of the robot
//to be inline with the target.
}
//This method is used for detecting IR
void infrared() {
// IRRead = digitalRead(IRSensor);
// Serial.println(IRRead); //print inferred value.
}